Have it free. (Plans)

Get your free plans here
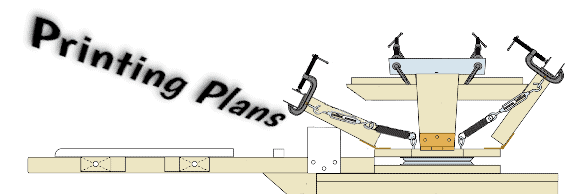
Free Plans for DIY Four Color Screen Printer
These plans include not only the four-color screen printer but a table to stand it on.
Even if you purchase the full kit, I would recommend that you build the table part of these plans so that you have a sturdy built table with screen storage slots upon which to put the printer. It helps keep things together.
These are absolutely free, simply enter your email on the order form and the plans are yours.
Have it cheap (Hardware)

Click here to order
Full Hardware Kit to Build the Free Plans
This is all of the required hardware for building your DIY four-color screen-printer.
Built correctly this printer will work through hundreds if not thousands of prints with multiple color layers to create your art on fabric and paper and more!
Have it Complete (Full Kit)

Click here to order
Full Micro Registratio Kit for Four Color Screen Printer
We don’t offer the plans for this fantastic printer.
Micro-Registration Four Color Screen Printer
With off-contact adjustments, micro-registration both left & right, tabletop mobility, sturdy precision, with an adjustable shirt platen!
The lumber for this kit is precision cut on a CNC Cutter to exact measurements. It includes all of the hardware to complete your four color screen printer.